前のチュートリアル: ハイダイナミックレンジイメージング
次のチュートリアル: 背景差分法の使い方
| |
| 原著者 | Jiri Horner |
| 互換性 | OpenCV >= 3.2 |
目的
このチュートリアルでは、以下の方法を学ぶ:
- use the high-level stitching API for stitching provided by
- あらかじめ用意されたStitcherの構成を使い、異なるカメラモデルで画像をスティッチングする方法を学ぶ。
コード
C++
このチュートリアルのコードを以下に示す。ここからダウンロードできる。
注意: C++版には画像分割 (–d3) やより詳細なエラー処理など、Pythonの例にはない追加オプションが含まれている。
#include <iostream>
bool divide_images = false;
vector<Mat> imgs;
string result_name = "result.jpg";
void printUsage(char** argv);
int parseCmdArgs(int argc, char** argv);
int main(
int argc,
char* argv[])
{
int retval = parseCmdArgs(argc, argv);
if (retval) return EXIT_FAILURE;
if (status != Stitcher::OK)
{
cout << "Can't stitch images, error code = " << int(status) << endl;
return EXIT_FAILURE;
}
imwrite(result_name, pano);
cout << "stitching completed successfully\n" << result_name << " saved!";
return EXIT_SUCCESS;
}
void printUsage(char** argv)
{
cout <<
"Images stitcher.\n\n" << "Usage :\n" << argv[0] <<" [Flags] img1 img2 [...imgN]\n\n"
"Flags:\n"
" --d3\n"
" internally creates three chunks of each image to increase stitching success\n"
" --mode (panorama|scans)\n"
" Determines configuration of stitcher. The default is 'panorama',\n"
" mode suitable for creating photo panoramas. Option 'scans' is suitable\n"
" for stitching materials under affine transformation, such as scans.\n"
" --output <result_img>\n"
" The default is 'result.jpg'.\n\n"
"Example usage :\n" << argv[0] << " --d3 --mode scans img1.jpg img2.jpg\n";
}
int parseCmdArgs(int argc, char** argv)
{
if (argc == 1)
{
printUsage(argv);
return EXIT_FAILURE;
}
for (int i = 1; i < argc; ++i)
{
if (string(argv[i]) == "--help" || string(argv[i]) == "/?")
{
printUsage(argv);
return EXIT_FAILURE;
}
else if (string(argv[i]) == "--d3")
{
divide_images = true;
}
else if (string(argv[i]) == "--output")
{
result_name = argv[i + 1];
i++;
}
else if (string(argv[i]) == "--mode")
{
if (string(argv[i + 1]) == "panorama")
mode = Stitcher::PANORAMA;
else if (string(argv[i + 1]) == "scans")
mode = Stitcher::SCANS;
else
{
cout << "Bad --mode flag value\n";
return EXIT_FAILURE;
}
i++;
}
else
{
Mat img =
imread(samples::findFile(argv[i]));
{
cout << "Can't read image '" << argv[i] << "'\n";
return EXIT_FAILURE;
}
if (divide_images)
{
imgs.push_back(img(rect).clone());
imgs.push_back(img(rect).clone());
imgs.push_back(img(rect).clone());
}
else
imgs.push_back(img);
}
}
return EXIT_SUCCESS;
}
n-dimensional dense array class
Definition mat.hpp:840
int cols
Definition mat.hpp:2204
bool empty() const
Returns true if the array has no elements.
int rows
the number of rows and columns or (-1, -1) when the matrix has more than 2 dimensions
Definition mat.hpp:2204
Template class for 2D rectangles.
Definition types.hpp:444
Mode
Definition stitching.hpp:161
Status
Definition stitching.hpp:153
std::shared_ptr< _Tp > Ptr
Definition cvstd_wrapper.hpp:23
Mat imread(const String &filename, int flags=IMREAD_COLOR_BGR)
Loads an image from a file.
int main(int argc, char *argv[])
Definition highgui_qt.cpp:3
Python
このチュートリアルのコードを以下に示す。ここからダウンロードできる。
注意: C++版には画像分割 (–d3) やより詳細なエラー処理など、Pythonの例にはない追加オプションが含まれている。
'''
Stitching sample
================
Show how to use Stitcher API from python in a simple way to stitch panoramas
or scans.
'''
from __future__ import print_function
import numpy as np
import cv2 as cv
import argparse
import sys
modes = (cv.Stitcher_PANORAMA, cv.Stitcher_SCANS)
parser = argparse.ArgumentParser(prog='stitching.py', description='Stitching sample.')
parser.add_argument('--mode',
type = int, choices = modes, default = cv.Stitcher_PANORAMA,
help = 'Determines configuration of stitcher. The default is `PANORAMA` (%d), '
'mode suitable for creating photo panoramas. Option `SCANS` (%d) is suitable '
'for stitching materials under affine transformation, such as scans.' % modes)
parser.add_argument('--output', default = 'result.jpg',
help = 'Resulting image. The default is `result.jpg`.')
parser.add_argument('img', nargs='+', help = 'input images')
__doc__ += '\n' + parser.format_help()
args = parser.parse_args()
imgs = []
for img_name in args.img:
if img is None:
print("can't read image " + img_name)
sys.exit(-1)
imgs.append(img)
status, pano = stitcher.stitch(imgs)
if status != cv.Stitcher_OK:
print("Can't stitch images, error code = %d" % status)
sys.exit(-1)
print("stitching completed successfully. %s saved!" % args.output)
print('Done')
if __name__ == '__main__':
print(__doc__)
static Ptr< Stitcher > create(Mode mode=Stitcher::PANORAMA)
Creates a Stitcher configured in one of the stitching modes.
cv::String findFile(const cv::String &relative_path, bool required=true, bool silentMode=false)
Try to find requested data file.
void destroyAllWindows()
Destroys all of the HighGUI windows.
bool imwrite(const String &filename, InputArray img, const std::vector< int > ¶ms=std::vector< int >())
Saves an image to a specified file.
解説
最も重要なコード部分は次のとおり:
C++
if (status != Stitcher::OK)
{
cout << "Can't stitch images, error code = " << int(status) << endl;
return EXIT_FAILURE;
}
Python
status, pano = stitcher.stitch(imgs)
if status != cv.Stitcher_OK:
print("Can't stitch images, error code = %d" % status)
sys.exit(-1)
新しいstitcherのインスタンスが生成され、cv::Stitcher::stitch がすべての重要な処理を行う。
cv::Stitcher::create はあらかじめ定義された構成のいずれかでstitcherを生成できる(引数 mode)。詳細は cv::Stitcher::Mode を参照。これらの構成は、あらかじめ定義されたシナリオのいずれかで動作するよう、stitcherの複数のプロパティを設定する。あらかじめ定義された構成でstitcherを生成した後は、任意のstitcherプロパティを設定してスティッチングを調整できる。
CUDAデバイスがあれば、cv::Stitcher は特定の処理をGPUにオフロードするよう構成できる。この構成を好む場合は try_use_gpu をtrueに設定する。このフラグに関係なく、グローバルなOpenCV設定に基づいてOpenCLアクセラレーションが透過的に使用される。
スティッチングはいくつかの理由で失敗することがあるため、常にすべてが正常に行われたかを確認し、結果のパノラマが pano に格納されているか確かめるべきである。考えられるエラーコードについては cv::Stitcher::Status のドキュメントを参照。
カメラモデル
現在、スティッチングパイプラインには2つのカメラモデルが実装されている。
ホモグラフィモデルはカメラで撮影した写真パノラマの作成に有用であり、一方でアフィンベースのモデルはスキャンや専用機器で撮影した物体のスティッチングに使用できる。
- 覚え書き
- cv::Stitcher の特定の詳細設定は意味をなさない場合がある。特に、アフィンモデルを実装するクラスとホモグラフィモデルを実装するクラスは異なる変換を扱うため、混在させてはならない。
試してみる
サンプルのビルドを有効にしていれば、バイナリは build/bin/cpp-example-stitching の下に見つかる。この例はコンソールアプリケーションであり、引数なしで実行するとヘルプが表示される。opencv_extra には、利用可能なすべての構成をテストするためのサンプルデータが含まれている。
パノラマモードを試すには次を実行する:
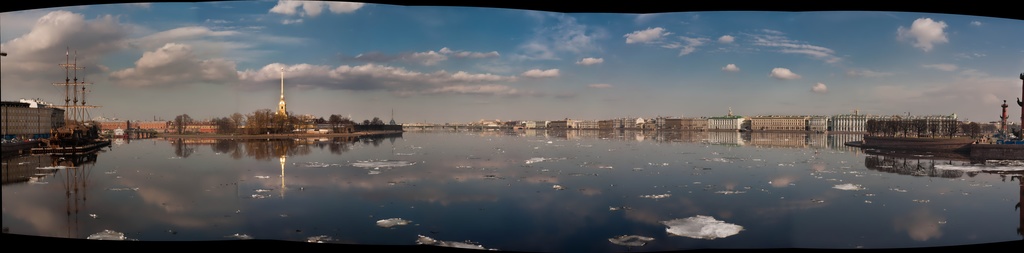
./cpp-example-stitching --mode panorama <path to opencv_extra>/testdata/stitching/boat*
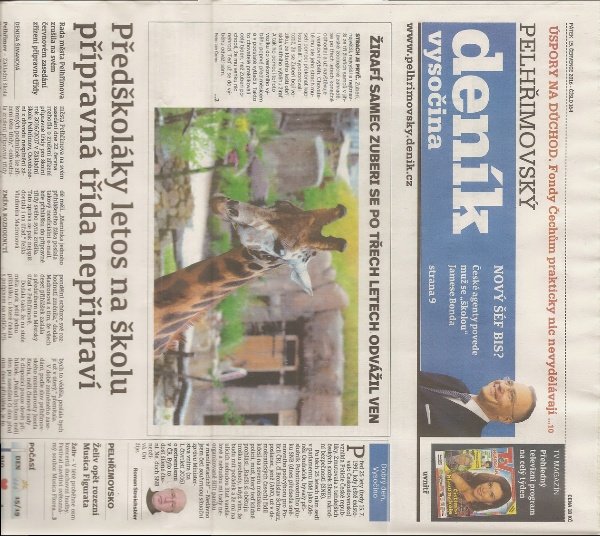
スキャンモードを試すには次を実行する(家庭用スキャナーのデータセット):
./cpp-example-stitching --mode scans <path to opencv_extra>/testdata/stitching/newspaper*
または(プロ用ブックスキャナーのデータセット):
./cpp-example-stitching --mode scans <path to opencv_extra>/testdata/stitching/budapest*
- 覚え書き
- 上記の例はPOSIXプラットフォームを想定している。Windowsでは、コマンドラインが
* 展開をサポートしないため、すべてのファイル名を明示的に指定する必要がある(例: boat1.jpg boat2.jpg...)。
詳細なスティッチング (python opencv >4.0.1)
スティッチングパイプラインの内部を学びたい場合や、詳細な構成を試したい場合は、C++またはPythonで利用できるstitching_detailedのソースコードを使用できる
stitching_detailed
C++
Python
stitching_detailedプログラムはコマンドラインからスティッチングのパラメータを取得する。多数のパラメータが存在する。上記の例はいくつかの利用可能なコマンドラインパラメータを示している:
boat5.jpg boat2.jpg boat3.jpg boat4.jpg boat1.jpg boat6.jpg –work_megapix 0.6 –features orb –matcher homography –estimator homography –match_conf 0.3 –conf_thresh 0.3 –ba ray –ba_refine_mask xxxxx –save_graph test.txt –wave_correct no –warp fisheye –blend multiband –expos_comp no –seam gc_colorgrad
画像のペアはホモグラフィ –matcher homography を使ってマッチングされ、変換推定にもestimator –estimator homography が使われる
特徴マッチングステップの信頼度は0.3: –match_conf 0.3。画像のマッチングに困難がある場合は、この値を小さくできる
2つの画像が同じパノラマに属するかどうかの信頼度のしきい値は0.: –conf_thresh 0.3。画像のマッチングに困難がある場合は、この値を小さくできる
バンドル調整のコスト関数はray –ba ray
バンドル調整の調整マスクはxxxxx ( –ba_refine_mask xxxxx) であり、'x' は該当パラメータを調整すること、'_' は調整しないことを意味する。1つを調整し、次の形式を持つ: fx,skew,ppx,aspect,ppy
マッチンググラフをDOT言語で表現してtest.txtに保存する ( –save_graph test.txt): ラベルの説明: Nm はマッチ数、Ni はインライア数、C は信頼度
ウェーブ効果補正を行わない (–wave_correct no)
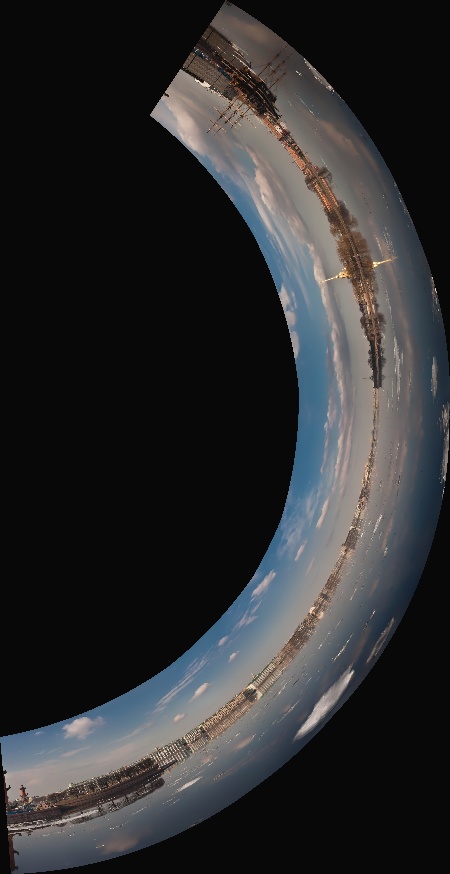
ワープ面のタイプはfisheye (–warp fisheye)
ブレンディング手法はmultiband (–blend multiband)
露出補正手法を使用しない (–expos_comp no)
シーム推定の推定器は最小グラフカットベースのシーム (–seam gc_colorgrad)
これらの引数はコマンドラインでも使用できる:
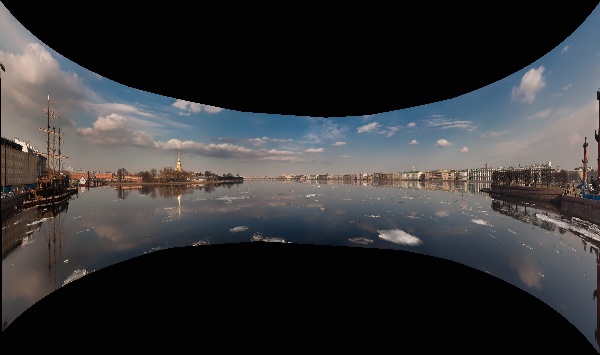
boat5.jpg boat2.jpg boat3.jpg boat4.jpg boat1.jpg boat6.jpg –work_megapix 0.6 –features orb –matcher homography –estimator homography –match_conf 0.3 –conf_thresh 0.3 –ba ray –ba_refine_mask xxxxx –wave_correct horiz –warp compressedPlaneA2B1 –blend multiband –expos_comp channels_blocks –seam gc_colorgrad
次の結果が得られる:
スキャナやドローンで撮影された画像(アフィン運動)の場合は、コマンドラインで次の引数を使用できる:
newspaper1.jpg newspaper2.jpg –work_megapix 0.6 –features surf –matcher affine –estimator affine –match_conf 0.3 –conf_thresh 0.3 –ba affine –ba_refine_mask xxxxx –wave_correct no –warp affine
すべての画像は https://github.com/opencv/opencv_extra/tree/4.x/testdata/stitching で見つけられる