目標
変換
OpenCVは2つの変換関数 cv.warpAffine と cv.warpPerspective を提供しており、これらを使ってあらゆる種類の変換を実行できる。cv.warpAffine は2x3の変換行列を取り、cv.warpPerspective は3x3の変換行列を入力として取る。
スケーリング
拡大縮小は画像のリサイズにほかならない。OpenCVにはこの目的のための関数 cv.resize() がある。画像のサイズは手動で指定することも、拡大縮小率を指定することもできる。さまざまな補間手法が使われる。推奨される補間手法は、縮小には cv.INTER_AREA、拡大には cv.INTER_CUBIC(低速)および cv.INTER_LINEAR である。デフォルトでは、すべてのリサイズ用途に補間手法 cv.INTER_LINEAR が使われる。入力画像は次のいずれかの方法でリサイズできる:
import numpy as np
import cv2 as cv
assert img is not None, "file could not be read, check with os.path.exists()"
res =
cv.resize(img,
None,fx=2, fy=2, interpolation = cv.INTER_CUBIC)
height, width = img.shape[:2]
res =
cv.resize(img,(2*width, 2*height), interpolation = cv.INTER_CUBIC)
Mat imread(const String &filename, int flags=IMREAD_COLOR_BGR)
Loads an image from a file.
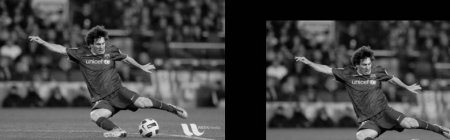
平行移動
平行移動とは物体の位置をずらすことである。(x,y)方向のずれが分かっており、それを \((t_x,t_y)\) とすると、次のように変換行列 \(\textbf{M}\) を作成できる:
\[M = \begin{bmatrix} 1 & 0 & t_x \\ 0 & 1 & t_y \end{bmatrix}\]
これを np.float32 型のNumpy配列にして、cv.warpAffine() 関数に渡すことができる。(100,50)だけ移動する以下の例を参照のこと:
import numpy as np
import cv2 as cv
img =
cv.imread(
'messi5.jpg', cv.IMREAD_GRAYSCALE)
assert img is not None, "file could not be read, check with os.path.exists()"
rows,cols = img.shape
M = np.float32([[1,0,100],[0,1,50]])
void imshow(const String &winname, InputArray mat)
Displays an image in the specified window.
int waitKey(int delay=0)
Waits for a pressed key.
void destroyAllWindows()
Destroys all of the HighGUI windows.
警告
cv.warpAffine() 関数の第3引数は出力画像のサイズであり、(width, height) の形式で指定する必要がある。width = 列数、height = 行数であることを覚えておくこと。
以下の結果を参照のこと。
image
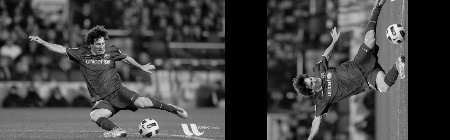
回転
角度 \(\theta\) での画像の回転は、次の形式の変換行列によって実現される
\[M = \begin{bmatrix} cos\theta & -sin\theta \\ sin\theta & cos\theta \end{bmatrix}\]
しかしOpenCVは回転中心を調整できるスケール付き回転を提供しており、好きな位置で回転できる。修正された変換行列は次で与えられる
\[\begin{bmatrix} \alpha & \beta & (1- \alpha ) \cdot center.x - \beta \cdot center.y \\ - \beta & \alpha & \beta \cdot center.x + (1- \alpha ) \cdot center.y \end{bmatrix}\]
ここで:
\[\begin{array}{l} \alpha = scale \cdot \cos \theta , \\ \beta = scale \cdot \sin \theta \end{array}\]
この変換行列を求めるために、OpenCVは関数 cv.getRotationMatrix2D を提供している。スケーリングを行わずに中心を基準に画像を90度回転させる以下の例を確認してほしい。
img =
cv.imread(
'messi5.jpg', cv.IMREAD_GRAYSCALE)
assert img is not None, "file could not be read, check with os.path.exists()"
rows,cols = img.shape
Mat getRotationMatrix2D(Point2f center, double angle, double scale)
Calculates an affine matrix of 2D rotation.
Definition 2d.hpp:858
結果を見てみる:
image
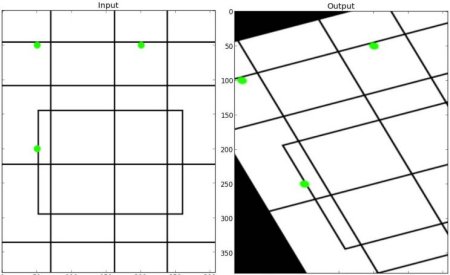
アフィン変換
アフィン変換では、元画像内のすべての平行な直線は出力画像でも平行なまま保たれる。変換行列を求めるには、入力画像から3点と、それらに対応する出力画像内の位置が必要である。すると cv.getAffineTransform が2x3の行列を生成し、これを cv.warpAffine に渡す。
以下の例を確認し、私が選んだ点(緑色でマークされている)も見てほしい:
assert img is not None, "file could not be read, check with os.path.exists()"
rows,cols,ch = img.shape
pts1 = np.float32([[50,50],[200,50],[50,200]])
pts2 = np.float32([[10,100],[200,50],[100,250]])
plt.subplot(121),plt.imshow(img),plt.title('Input')
plt.subplot(122),plt.imshow(dst),plt.title('Output')
plt.show()
Mat getAffineTransform(const Point2f src[], const Point2f dst[])
Calculates an affine transform from three pairs of the corresponding points.
結果を見てみる:
image
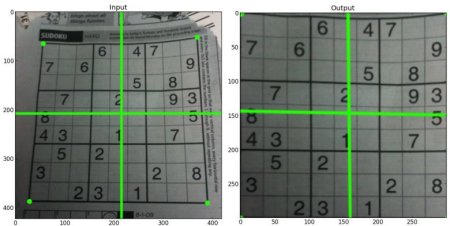
透視変換
透視変換には3x3の変換行列が必要である。変換後も直線は直線のまま保たれる。この変換行列を求めるには、入力画像上の4点と、出力画像上の対応する点が必要である。これら4点のうち、3点は同一直線上にあってはならない。すると、変換行列は関数 cv.getPerspectiveTransform で求められる。続いて、この3x3変換行列を用いて cv.warpPerspective を適用する。
以下のコードを見てほしい:
assert img is not None, "file could not be read, check with os.path.exists()"
rows,cols,ch = img.shape
pts1 = np.float32([[56,65],[368,52],[28,387],[389,390]])
pts2 = np.float32([[0,0],[300,0],[0,300],[300,300]])
plt.subplot(121),plt.imshow(img),plt.title('Input')
plt.subplot(122),plt.imshow(dst),plt.title('Output')
plt.show()
Mat getPerspectiveTransform(InputArray src, InputArray dst, int solveMethod=DECOMP_LU)
Calculates a perspective transform from four pairs of the corresponding points.
結果:
image
追加リソース
- 「Computer Vision: Algorithms and Applications」, Richard Szeliski