前のチュートリアル: ブラウザでディープネットワークを実行する方法
次のチュートリアル: カスタム OCR モデルを実行する方法
| |
| 原著者 | Dmitry Kurtaev |
| 互換性 | OpenCV >= 3.4.1 |
はじめに
ディープラーニングは急速に成長している分野である。ニューラルネットワークを構築する新しいアプローチは、通常、新しい種類のレイヤーを導入する。これらは既存のものの変形であったり、優れた研究アイデアの実装であったりする。
OpenCV では、さまざまなディープラーニングフレームワークからネットワークをインポートして実行できる。最も一般的なレイヤーは多数存在する。しかし、ネットワークの一部のレイヤーが OpenCV のディープラーニングエンジンで実装されていないために、ネットワークを OpenCV でインポートできないという問題に直面することがある。
1 つ目の解決策は、https://github.com/opencv/opencv/issues でモデルのソースや新しいレイヤーの種類などの詳細を記載した機能リクエストを作成することである。OpenCV コミュニティがこのニーズを共有すれば、新しいレイヤーが実装される可能性がある。
2 つ目の方法は、カスタムレイヤーを定義し、OpenCV のディープラーニングエンジンがその使い方を理解できるようにすることである。このチュートリアルは、ディープラーニングモデルのインポートをカスタマイズするプロセスを示すことを目的としている。
C++ でのカスタムレイヤの定義
ディープラーニングのレイヤーはネットワークのパイプラインを構成する基本要素である。入力blobへの接続を持ち、出力blobに結果を出力する。学習済みの重みとハイパーパラメータがある。レイヤーの名前、型、重み、ハイパーパラメータは、学習時にネイティブのフレームワークによって生成されるファイルに保存される。OpenCVが未知のレイヤー型に遭遇すると、モデルを読み込もうとした時点で例外をスローする:
Unspecified error: Can't create layer "layer_name" of type "MyType" in function getLayerInstance
モデルを正しくインポートするには、cv::dnn::Layer を継承したクラスを作成し、次のメソッドを実装する必要がある:
{
public:
const int requiredOutputs,
std::vector<std::vector<int> > &outputs,
std::vector<std::vector<int> > &internals)
const CV_OVERRIDE;
};
そしてインポートの前にそれを登録する:
static inline void loadNet()
{
- 覚え書き
MyType は、スローされた例外に含まれる未実装レイヤーの型である。
各メソッドが何をするのか見てみよう:
cv::dnn::LayerParams からハイパーパラメータを取得する。レイヤーが学習可能な重みを持つ場合、それらはすでにLayerのメンバ cv::dnn::Layer::blobs に格納されている。
このメソッドは、自作レイヤーのインスタンスを生成し、それを格納した cv::Ptr を返す。
const int requiredOutputs,
std::vector<std::vector<int> > &outputs,
std::vector<std::vector<int> > &internals)
const CV_OVERRIDE;
入力形状に応じてレイヤーの出力形状を返す。internals を使って追加のメモリを要求することもできる。
ここにレイヤーのロジックを実装する。与えられた入力に対して出力を計算する。
- 覚え書き
- OpenCVはレイヤー用に確保したメモリを管理する。ほとんどの場合、同じメモリがレイヤー間で再利用される。したがって、
forward の実装は、2回目の forward 呼び出し時に outputs や internals に同じデータが入っていることに依存してはならない。
メソッドの呼び出しの流れは次のとおりである。OpenCVのディープラーニングエンジンは create メソッドを1回呼び出し、次に生成された各レイヤーに対して getMemoryShapes を呼び出す。その後、判明した入力次元に応じた準備を cv::dnn::Layer::finalize で行える。ネットワークが初期化された後は、各ネットワーク入力に対して forward メソッドのみが呼び出される。
- 覚え書き
- 高さ、幅、バッチサイズといった入力blobのサイズが変動すると、OpenCVは内部メモリをすべて再確保する。これは効率の低下につながる。固定のバッチサイズと画像の次元を用いてモデルを初期化・デプロイするとよい。
例: TensorFlow のカスタムレイヤ
これは tf.image.resize_bilinear 演算を含むネットワークをインポートする方法の例である。これもリサイズだが、OpenCV 組み込みの resize とは異なる実装になっている。
単一レイヤーのネットワークを作成してみよう:
inp = tf.placeholder(tf.float32, [2, 3, 4, 5], 'input')
resized = tf.image.resize_bilinear(inp, size=[9, 8], name='resize_bilinear')
OpenCVはTensorFlowのグラフを次のように認識する:
node {
name: "input"
op: "Placeholder"
attr {
key: "dtype"
value {
type: DT_FLOAT
}
}
}
node {
name: "resize_bilinear/size"
op: "Const"
attr {
key: "dtype"
value {
type: DT_INT32
}
}
attr {
key: "value"
value {
tensor {
dtype: DT_INT32
tensor_shape {
dim {
size: 2
}
}
tensor_content: "\t\000\000\000\010\000\000\000"
}
}
}
}
node {
name: "resize_bilinear"
op: "ResizeBilinear"
input: "input:0"
input: "resize_bilinear/size"
attr {
key: "T"
value {
type: DT_FLOAT
}
}
attr {
key: "align_corners"
value {
b: false
}
}
}
library {
}
TensorFlowからのカスタムレイヤーのインポートは、レイヤーのすべての attr を cv::dnn::LayerParams に、入力の Const blobを cv::dnn::Layer::blobs に格納するよう設計されている。今回の場合、リサイズの出力形状はレイヤーの blobs[0] に格納される。
{
public:
{
for (size_t i = 0; i < blobs.size(); ++i)
if (blobs.size() == 1)
{
outHeight = blobs[0].at<int>(0, 0);
outWidth = blobs[0].at<int>(0, 1);
factorHeight = factorWidth = 0;
}
else
{
factorHeight = blobs[0].at<int>(0, 0);
factorWidth = blobs[1].at<int>(0, 0);
outHeight = outWidth = 0;
}
}
{
}
const int,
std::vector<std::vector<int> > &outputs,
{
std::vector<int> outShape(4);
outShape[0] = inputs[0][0];
outShape[1] = inputs[0][1];
outShape[2] = outHeight != 0 ? outHeight : (inputs[0][2] * factorHeight);
outShape[3] = outWidth != 0 ? outWidth : (inputs[0][3] * factorWidth);
outputs.assign(1, outShape);
return false;
}
{
outputs_arr.getMatVector(outputs);
if (!outWidth && !outHeight)
{
outHeight = outputs[0].size[2];
outWidth = outputs[0].size[3];
}
}
{
if (inputs_arr.depth() ==
CV_16S)
{
return;
}
inputs_arr.getMatVector(inputs);
outputs_arr.getMatVector(outputs);
const float* inpData = (
float*)inp.
data;
float* outData = (float*)out.data;
const int batchSize = inp.size[0];
const int numChannels = inp.size[1];
const int inpHeight = inp.size[2];
const int inpWidth = inp.size[3];
float heightScale = static_cast<float>(inpHeight) / outHeight;
float widthScale = static_cast<float>(inpWidth) / outWidth;
for (int b = 0; b < batchSize; ++b)
{
for (int y = 0; y < outHeight; ++y)
{
float input_y = y * heightScale;
int y0 = static_cast<int>(std::floor(input_y));
int y1 = std::min(y0 + 1, inpHeight - 1);
for (int x = 0; x < outWidth; ++x)
{
float input_x = x * widthScale;
int x0 = static_cast<int>(std::floor(input_x));
int x1 = std::min(x0 + 1, inpWidth - 1);
for (int c = 0; c < numChannels; ++c)
{
float interpolation =
inpData[offset(inp.size, c, x0, y0, b)] * (1 - (input_y - y0)) * (1 - (input_x - x0)) +
inpData[offset(inp.size, c, x0, y1, b)] * (input_y - y0) * (1 - (input_x - x0)) +
inpData[offset(inp.size, c, x1, y0, b)] * (1 - (input_y - y0)) * (input_x - x0) +
inpData[offset(inp.size, c, x1, y1, b)] * (input_y - y0) * (input_x - x0);
outData[offset(out.size, c, x, y, b)] = interpolation;
}
}
}
}
}
private:
static inline int offset(const cv::MatSize& size, int c, int x, int y, int b)
{
}
int outWidth, outHeight, factorWidth, factorHeight;
};
次に、レイヤーを登録してモデルのインポートを試みる。
例: ONNX のカスタムレイヤ
ONNX は演算子をドメイン(domain)ごとにグループ化する。標準の演算子はデフォルトドメイン ai.onnx に属し、ベンダーやエクスポータは独自の演算子を my.namespace のような名前付きドメインに配置することが多い。OpenCV が ONNX ノードをインポートする際、cv::dnn::LayerFactory 内で次のキーにより演算子を検索する:
- デフォルトの
ai.onnx ドメイン(またはドメインなし)のノードについては op_type 単独で、そして
- デフォルト以外のドメインのノードについては
"<domain>.<op_type>" で検索する。
ノードの属性は、同じ名前を持つ cv::dnn::LayerParams のエントリとしてレイヤのコンストラクタに渡される。属性 scale と bias を持ち y = scale * x + bias を計算する演算子 MyCustomOp を考えてみる。その実装は次のようになる:
{
public:
{
bias =
params.get<
float>(
"bias", 0.f);
}
{
return makePtr<CustomScaleBiasLayer>(params);
}
bool getMemoryShapes(const vector<MatShape>& inpts,
const int ,
vector<MatShape>& outShapes,
{
outShapes.assign(1, inpts[0]);
return false;
}
{
vector<Mat> inps, outs;
inputs_arr.getMatVector(inps);
outputs_arr.getMatVector(outs);
inps[0].convertTo(outs[0], outs[0].type(), scale, bias);
}
private:
};
この演算子を使用するモデルをインポートするには、cv::dnn::readNetFromONNX を呼び出す前にレイヤを登録する。実行時の登録には cv::dnn::LayerFactory::registerLayer を使用する(終了時には cv::dnn::LayerFactory::unregisterLayer を使用する)。上で説明したとおり、演算子のドメインに応じた適切なキーを選ぶこと:
LayerFactory::registerLayer(opKey, CustomScaleBiasLayer::create);
完全な実行可能例は samples/dnn/custom_layer_onnx.cpp にある。デフォルトドメインとカスタムドメインの両方の登録経路を試せる小さな ONNX モデルは、opencv_extra リポジトリの generate_custom_layer_models.py で生成できる。
Python でのカスタムレイヤの定義
次の例は、PythonでOpenCVのレイヤーをカスタマイズする方法を示している。
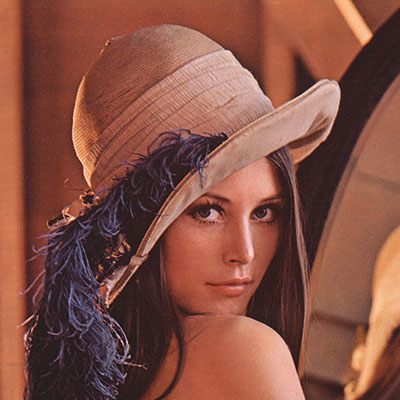
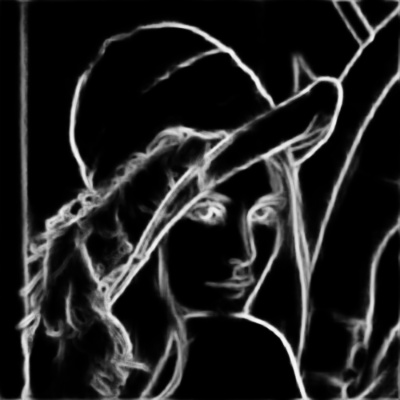
Holistically-Nested Edge Detection モデルを考えてみる。このモデルの Crop レイヤは2つの入力ブロブを受け取り、1つ目を2つ目の空間次元に合わせてクロップする。OpenCV 組み込みの Crop レイヤは左上隅からトリミングするが、このモデルは中央からのクロップを想定しているため、組み込みの挙動をそのまま使うと、ずれた結果と埋められた境界が生じてしまう。
次に、左上クロップを行うOpenCVの Crop レイヤーを、中央クロップを行うものに置き換える。
getMemoryShapes メソッドと forward メソッドを持つクラスを作成する
class CropLayer(object):
def __init__(self, params, blobs):
self.xstart = 0
self.xend = 0
self.ystart = 0
self.yend = 0
def getMemoryShapes(self, inputs):
inputShape, targetShape = inputs[0], inputs[1]
batchSize, numChannels = inputShape[0], inputShape[1]
height, width = targetShape[2], targetShape[3]
self.ystart = (inputShape[2] - targetShape[2]) // 2
self.xstart = (inputShape[3] - targetShape[3]) // 2
self.yend = self.ystart + height
self.xend = self.xstart + width
return [[batchSize, numChannels, height, width]]
def forward(self, inputs):
return [inputs[0][:,:,self.ystart:self.yend,self.xstart:self.xend]]
- 覚え書き
- どちらのメソッドもリストを返す必要がある。
cv.dnn_registerLayer('Crop', CropLayer)
これで完了である。実装済みの OpenCV のレイヤをカスタムレイヤに置き換えた。完全なスクリプトはソースコードで確認できる。