目標
この章では、ヒストグラム逆投影 (histogram backprojection) について学ぶ。
理論
これは Michael J. Swain , Dana H. Ballard が論文 Indexing via color histograms で提案した手法である。
簡単に言うと、これは実際何なのか? これは画像のセグメンテーション(領域分割)や、画像中の関心対象を見つけるために使われる。簡単に言えば、入力画像と同じサイズ(ただしシングルチャンネル)の画像を生成し、各ピクセルがそのピクセルが対象に属する確率に対応するようにする。さらにわかりやすく言えば、出力画像では関心対象が残りの部分に比べてより白く表現される。まあ、これは直感的な説明である。(これ以上わかりやすくはできない。) ヒストグラム逆投影は camshift アルゴリズムなどと組み合わせて使われる。
どうやって行うのか? 関心対象(この例では、選手やその他のものを除いた地面)を含む画像のヒストグラムを作成する。よい結果を得るには、対象が可能な限り画像を埋めているほうがよい。また、グレースケールヒストグラムよりカラーヒストグラムが好ましい。なぜなら、対象を定義するうえで、グレースケール強度よりも対象の色のほうがよい手がかりとなるからである。次に、対象を見つけたいテスト画像に対してこのヒストグラムを"逆投影 (back-project)"する。言い換えると、すべてのピクセルが地面に属する確率を計算して表示する。得られた出力を適切にしきい値処理すると、地面だけが取り出される。
Numpy によるアルゴリズム
- まず、見つけたい対象(これを 'M' とする)と、検索対象の画像(これを 'I' とする)の両方のカラーヒストグラムを計算する必要がある。
import numpy as np
import cv2 as cvfrom matplotlib import pyplot as plt
assert roi is not None, "file could not be read, check with os.path.exists()"
assert target is not None, "file could not be read, check with os.path.exists()"
M =
cv.calcHist([hsv],[0, 1],
None, [180, 256], [0, 180, 0, 256] )
I =
cv.calcHist([hsvt],[0, 1],
None, [180, 256], [0, 180, 0, 256] )
Mat imread(const String &filename, int flags=IMREAD_COLOR_BGR)
Loads an image from a file.
void cvtColor(InputArray src, OutputArray dst, int code, int dstCn=0, AlgorithmHint hint=cv::ALGO_HINT_DEFAULT)
Converts an image from one color space to another.
void calcHist(const Mat *images, int nimages, const int *channels, InputArray mask, OutputArray hist, int dims, const int *histSize, const float **ranges, bool uniform=true, bool accumulate=false)
Calculates a histogram of a set of arrays.
- 比 \(R = \frac{M}{I}\) を求める。次に R を逆投影する。すなわち R をパレットとして用い、各ピクセルがそのピクセルに対応する対象である確率を持つ新しい画像を作成する。つまり B(x,y) = R[h(x,y),s(x,y)] であり、ここで h は (x,y) にあるピクセルの色相(hue)、s は彩度(saturation)である。その後、条件 \(B(x,y) = min[B(x,y), 1]\) を適用する。
B = R[h.ravel(),s.ravel()]
B = np.minimum(B,1)
B = B.reshape(hsvt.shape[:2])
void split(const Mat &src, Mat *mvbegin)
Divides a multi-channel array into several single-channel arrays.
- 次に、円盤状のディスクで畳み込みを適用する。\(B = D \ast B\) であり、ここで D はディスクカーネルである。
B = np.uint8(B)
void normalize(InputArray src, InputOutputArray dst, double alpha=1, double beta=0, int norm_type=NORM_L2, int dtype=-1, InputArray mask=noArray())
Normalizes the norm or value range of an array.
void filter2D(InputArray src, OutputArray dst, int ddepth, InputArray kernel, Point anchor=Point(-1,-1), double delta=0, int borderType=BORDER_DEFAULT)
Convolves an image with the kernel.
Mat getStructuringElement(int shape, Size ksize, Point anchor=Point(-1,-1))
Returns a structuring element of the specified size and shape for morphological operations.
- ここで、最大強度の位置が対象の位置を示す。画像中の領域を期待している場合は、適切な値でしきい値処理を行うとよい結果が得られる。
double threshold(InputArray src, OutputArray dst, double thresh, double maxval, int type)
Applies a fixed-level threshold to each array element.
以上である!!
OpenCV による逆投影
OpenCV には組み込み関数 cv.calcBackProject() が用意されている。その引数は cv.calcHist() 関数とほぼ同じである。その引数の1つは、対象のヒストグラムであり、これを求める必要がある。また、逆投影関数に渡す前に対象ヒストグラムを正規化しておくべきである。この関数は確率画像を返す。次にその画像をディスクカーネルで畳み込み、しきい値処理を適用する。以下は私のコードと出力である:
import numpy as np
import cv2 as cv
assert roi is not None, "file could not be read, check with os.path.exists()"
assert target is not None, "file could not be read, check with os.path.exists()"
roihist =
cv.calcHist([hsv],[0, 1],
None, [180, 256], [0, 180, 0, 256] )
thresh =
cv.merge((thresh,thresh,thresh))
res = np.vstack((target,thresh,res))
void bitwise_and(InputArray src1, InputArray src2, OutputArray dst, InputArray mask=noArray())
computes bitwise conjunction of the two arrays (dst = src1 & src2) Calculates the per-element bit-wis...
void merge(const Mat *mv, size_t count, OutputArray dst)
Creates one multi-channel array out of several single-channel ones.
bool imwrite(const String &filename, InputArray img, const std::vector< int > ¶ms=std::vector< int >())
Saves an image to a specified file.
void calcBackProject(const Mat *images, int nimages, const int *channels, InputArray hist, OutputArray backProject, const float **ranges, double scale=1, bool uniform=true)
Calculates the back projection of a histogram.
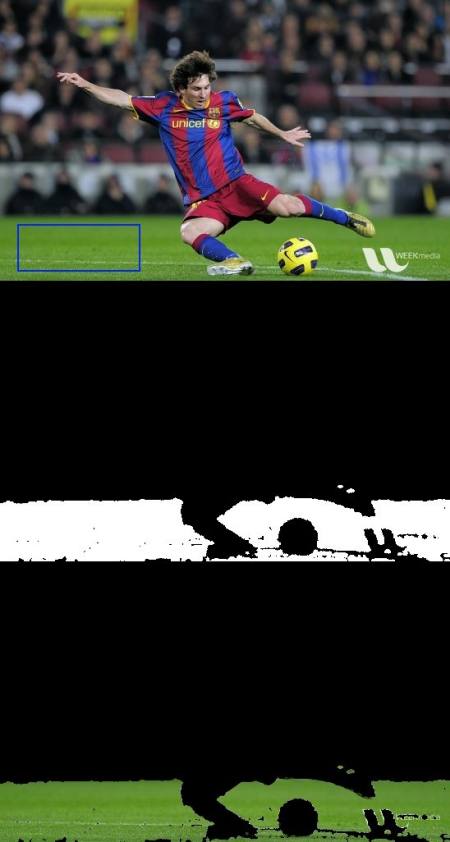
以下は私が扱った一例である。青い矩形の内側の領域をサンプル対象として用い、地面全体を抽出しようとした。
image
追加リソース
- "Indexing via color histograms", Swain, Michael J. , Third international conference on computer vision,1990.