前のチュートリアル: 異方性画像セグメンテーションのG-APIへの移植
はじめに
このチュートリアルでは以下を学ぶ:
- 顔の美化アルゴリズムのサンプルの基礎;
- G-APIを使ってパイプライン内で異なるネットワークを推論する方法;
- ビデオストリーム上でG-APIパイプラインを実行する方法。
前提条件
このサンプルには以下が必要である:
- GNU/LinuxまたはMicrosoft WindowsのPC(Apple macOSもサポートされているが、テストはされていない);
- Intel® Distribution of OpenVINO™ Toolkit でビルドされたOpenCV 4.2以降(Intel® TBB でビルドするとなお良い);
- The following topologies from OpenVINO™ Toolkit Open Model Zoo:
face-detection-adas-0001;facial-landmarks-35-adas-0002.
顔の美化アルゴリズム
ここでは、最新のディープラーニング技術と従来のコンピュータビジョンを組み合わせて、シンプルな顔の美化アルゴリズムを実装する。このアルゴリズムの基本的な考え方は、目や口のコントラストといった顔の特徴を保ちつつ、顔の肌をより滑らかにすることである。アルゴリズムはDNN推論を使って顔の各部位を識別し、見つかった部位ごとに異なるフィルタを適用し、基本的な画像演算を使ってそれらを最終結果に合成する:
アルゴリズムを簡潔に説明すると以下のとおりである:
- 入力画像 \(I\) はアンシャープマスクとバイラテラルフィルタ(それぞれ \(U\) と \(L\))に渡される;
- 入力画像 \(I\) はSSDベースの顔検出器に渡される;
- SSDの結果(\([1 \times 1 \times 200 \times 7]\) のblob)が解析され、顔の配列に変換される;
- 各顔はランドマーク検出器に渡される;
- Based on landmarks found for every face, three image masks are generated:
- 背景マスク \(b\) — 元画像のどの領域をそのまま保持するかを示す;
- 顔の部位マスク \(p\) — 保持(シャープ化)すべき領域を識別する。
- 顔の肌マスク \(s\) — 平滑化すべき領域を識別する;
- 最終結果 \(O\) は上記の特徴の合成であり、\(O = b*I + p*U + s*L\) として計算される。
限られた特徴量の集合(顔ごとに全部位を含めてわずか35点)に基づいて顔要素のマスクを生成するのはそれほど単純ではなく、以下のセクションで説明する。
G-APIパイプラインの構築
ディープラーニングトポロジーの宣言
このサンプルでは2つのDNN検出器を使用する。各ネットワークは1つの入力を受け取り、1つの出力を生成する。G-APIでは、ネットワークはマクロ G_API_NET() で定義される:
より詳しい情報については、「Face Analytics pipeline」チュートリアルで説明されている ディープラーニングトポロジーの宣言 を参照のこと。
処理グラフの記述
以下のコードは、上記のアルゴリズムのグラフを生成する:
{
GArrayROI garRects = custom::GFacePostProc::on(faceOut, gimgIn, config::kConfThresh);
std::tie(garElems, garJaws) = custom::GLandmPostProc::on(landmOut, garRects);
std::tie(garElsConts, garFaceConts) = custom::GGetContours::on(garElems, garJaws);
cv::GMat mskSharp = custom::GFillPolyGContours::on(gimgIn, garElsConts);
config::kGSigma);
cv::GMat mskBlur = custom::GFillPolyGContours::on(gimgIn, garFaceConts);
config::kGSigma);
cv::GMat mskFacesGaussed = mskBlurFinal + mskSharpG;
cv::GMat gimgBilat = custom::GBilatFilter::on(gimgIn, config::kBSize,
config::kBSigmaCol, config::kBSigmaSp);
cv::GMat gimgSharp = custom::unsharpMask(gimgIn, config::kUnshSigma,
config::kUnshStrength);
cv::GMat gimgBilatMasked = custom::mask3C(gimgBilat, mskBlurFinal);
cv::GMat gimgSharpMasked = custom::mask3C(gimgSharp, mskSharpG);
cv::GMat gimgInMasked = custom::mask3C(gimgIn, mskNoFaces);
cv::GMat gimgBeautif = gimgBilatMasked + gimgSharpMasked + gimgInMasked;
garFaceConts,
garElsConts,
garRects));
});
結果として得られるグラフは、G-APIの標準演算、ユーザー定義演算(名前空間 custom::)、およびDNN推論の混合である。汎用関数 cv::gapi::infer<>() により、パイプライン内で推論をトリガーできる。推論するネットワークはテンプレート引数として指定する。このサンプルコードでは、cv::gapi::infer<>() の2つのバージョンを使用している:
- フレーム指向のものは、入力フレーム上の顔を検出するために使用される。
- ROIリスト指向のものは、顔のリスト上でランドマーク推論を実行するために使用される — このバージョンは顔ごとにランドマークの配列を生成する。
詳細は「Face Analytics pipeline」(GComputationの構築 のセクション)を参照のこと。
G-APIによるアンシャープマスク
画像 \(I\) に対するアンシャープマスク \(U\) は次のように定義される:
\[U = I - s * L(M(I)),\]
ここで \(M()\) はメディアンフィルタ、\(L()\) はラプラス演算子、\(s\) は強度係数である。G-APIはこの関数を標準で提供していないが、既存のG-API演算で自然に表現できる:
const int sigma,
const float strength)
{
return (src - (laplacian * strength));
}
上記のコードスニペットは、G-APIの型で定義された通常のC++関数であることに注意。ユーザーはこのような関数を記述してグラフの構築を簡素化できる。呼び出されると、この関数は使用先のパイプラインに関連するノードを追加するだけである。
カスタム演算
顔の美化グラフはカスタム演算を多用している。本章では最も興味深いカーネルに焦点を当てる。G-APIにおける演算の定義とカーネルの実装に関する一般的な情報については、G-API Kernel API を参照のこと。
顔検出器の後処理
顔検出器の出力は、以下のカーネルで顔の配列に変換される:
using VectorROI = std::vector<cv::Rect>;
{
static void run(
const cv::Mat &inDetectResult,
const float faceConfThreshold,
VectorROI &outFaces)
{
const int kObjectSize = 7;
const int imgCols = inFrame.
size().width;
const int imgRows = inFrame.
size().height;
outFaces.clear();
const int numOfDetections = inDetectResult.
size[2];
const float *data = inDetectResult.
ptr<
float>();
for (int i = 0; i < numOfDetections; i++)
{
const float faceId = data[i * kObjectSize + 0];
if (faceId < 0.f)
{
break;
}
const float faceConfidence = data[i * kObjectSize + 2];
if (faceConfidence > faceConfThreshold)
{
const float left = data[i * kObjectSize + 3];
const float top = data[i * kObjectSize + 4];
const float right = data[i * kObjectSize + 5];
const float bottom = data[i * kObjectSize + 6];
toIntRounded(top * imgRows));
toIntRounded(bottom * imgRows));
outFaces.push_back(
cv::Rect(tl, br) & borders);
}
}
}
};
顔のランドマークの後処理
このアルゴリズムは、OpenVINO™ Open Model Zoo の汎用顔ランドマーク検出器(詳細)を使って、目・口・頭部の輪郭そのものといった顔要素の位置を推論する。しかし、検出されたランドマークはそのままではマスクを生成するのに十分ではない — この操作には閉じた輪郭で表される顔上の関心領域が必要であるため、それらを得るために補間が適用される。このランドマーク処理と補間は、以下のカーネルで実行される:
{
static void run(const std::vector<Landmarks> &vctPtsFaceElems,
const std::vector<Contour> &vctCntJaw,
std::vector<Contour> &vctElemsContours,
std::vector<Contour> &vctFaceContours)
{
size_t numFaces = vctCntJaw.size();
CV_Assert(numFaces == vctPtsFaceElems.size());
vctElemsContours.reserve(numFaces * 4);
vctFaceContours.reserve(numFaces);
Contour cntFace, cntLeftEye, cntRightEye, cntNose, cntMouth;
cntNose.reserve(4);
for (size_t i = 0ul; i < numFaces; i++)
{
cntLeftEye = getEyeEllipse(vctPtsFaceElems[i][1], vctPtsFaceElems[i][0]);
cntLeftEye.insert(cntLeftEye.end(), {vctPtsFaceElems[i][12], vctPtsFaceElems[i][13],
vctPtsFaceElems[i][14]});
cntRightEye = getEyeEllipse(vctPtsFaceElems[i][2], vctPtsFaceElems[i][3]);
cntRightEye.insert(cntRightEye.end(), {vctPtsFaceElems[i][15], vctPtsFaceElems[i][16],
vctPtsFaceElems[i][17]});
cntNose.clear();
cntNose.insert(cntNose.end(), {vctPtsFaceElems[i][4], vctPtsFaceElems[i][7],
vctPtsFaceElems[i][5], vctPtsFaceElems[i][6]});
cntMouth = getPatchedEllipse(vctPtsFaceElems[i][8], vctPtsFaceElems[i][9],
vctPtsFaceElems[i][10], vctPtsFaceElems[i][11]);
vctElemsContours.insert(vctElemsContours.end(), {cntLeftEye, cntRightEye, cntNose, cntMouth});
cntFace = getForeheadEllipse(vctCntJaw[i][0], vctCntJaw[i][16], vctCntJaw[i][8]);
std::copy(vctCntJaw[i].crbegin(), vctCntJaw[i].crend(), std::back_inserter(cntFace));
vctFaceContours.push_back(cntFace);
}
}
};
このカーネルは、非正規化されたランドマーク座標の2つの配列を受け取り、要素の閉じた輪郭の配列と顔の閉じた輪郭の配列を返す。言い換えると、出力は、1つ目がシャープ化される画像領域の輪郭の配列、2つ目が平滑化される領域の輪郭のもう1つの配列である。
ここおよび以下では、Contour は点のベクトルである。
目の輪郭の取得
目の輪郭は以下の関数で推定される:
inline int custom::getLineInclinationAngleDegrees(
const cv::Point &ptLeft,
const cv::Point &ptRight)
{
if (residual.
y == 0 && residual.
x == 0)
return 0;
else
return toIntRounded(
atan2(toDouble(residual.
y), toDouble(residual.
x)) * 180.0 /
CV_PI);
}
{
Contour cntEyeBottom;
const cv::Point ptEyeCenter((ptRight + ptLeft) / 2);
const int angle = getLineInclinationAngleDegrees(ptLeft, ptRight);
const int axisX = toIntRounded(
cv::norm(ptRight - ptLeft) / 2.0);
const int axisY = axisX / 3;
static constexpr int kAngEyeStart = 0;
static constexpr int kAngEyeEnd = 180;
cntEyeBottom);
return cntEyeBottom;
}
簡潔に言うと、この関数は左右の目尻の2点に基づいて半楕円で目の下側を復元する。実際には、cv::ellipse2Poly() を使って目の領域を近似し、関数はわずか2点に基づいて楕円のパラメータを定義するだけである:
- 楕円の中心と \(X\) 半軸は2つの目のPointから計算される;
- \(Y\) 半軸は、平均的な目の幅がその長さの \(1/3\) であるという仮定に従って計算される;
- 開始角と終了角はそれぞれ0と180である(
cv::ellipse() のドキュメントを参照);
- 角度デルタ:輪郭にどれだけの点を生成するか;
- 軸の傾斜角。
関数 custom::getLineInclinationAngleDegrees() において、単なる atan() ではなく atan2() を使うことは本質的に重要である。なぜなら、x と y の符号に応じて負の値を返すことができるため、顔が上下逆さまに配置されている場合でも(もちろん点を正しい順序で与えれば)正しい角度を得られるからである。
額の輪郭の取得
この関数は額の輪郭を近似する:
inline Contour custom::getForeheadEllipse(
const cv::Point &ptJawLeft,
{
Contour cntForehead;
const cv::Point ptFaceCenter((ptJawLeft + ptJawRight) / 2);
const int angFace = getLineInclinationAngleDegrees(ptJawLeft, ptJawRight);
const double jawWidth =
cv::norm(ptJawLeft - ptJawRight);
const int axisX = toIntRounded(jawWidth / 2.0);
const double jawHeight =
cv::norm(ptFaceCenter - ptJawLower);
const int axisY = toIntRounded(jawHeight * 2 / 3.0);
static constexpr int kAngForeheadStart = 180;
static constexpr int kAngForeheadEnd = 360;
config::kAngDelta, cntForehead);
return cntForehead;
}
検出されたランドマークにはあごの点しかないため、あごの3点(最も左、最も右、最も下の点)に基づいて半楕円を求める必要がある。あごの幅は額の幅と等しいと仮定し、後者は左右の点を使って計算する。\(Y\) 軸については、直接求める点がないため、代わりに額の高さがあごの高さの約 \(2/3\) であると仮定する。これは顔の中心(左右の点の中間)と最も下のあごの点から求められる。
マスクの描画
必要なすべての輪郭が揃ったら、マスクを描画できる:
cv::GMat mskSharp = custom::GFillPolyGContours::on(gimgIn, garElsConts);
config::kGSigma);
cv::GMat mskBlur = custom::GFillPolyGContours::on(gimgIn, garFaceConts);
config::kGSigma);
cv::GMat mskFacesGaussed = mskBlurFinal + mskSharpG;
マスクを取得する手順は以下のとおりである:
- the "sharp" mask calculation:
- シャープ化すべき輪郭を塗りつぶす;
- それを平滑化して「シャープ」マスク(
mskSharpG)を得る;
- the "bilateral" mask calculation:
- すべての顔の輪郭を完全に塗りつぶす;
- それを平滑化する;
- 「シャープ」マスクと交差する領域を減算する — そして「バイラテラル」マスク(
mskBlurFinal)を得る;
- the background mask calculation:
パイプラインの設定と実行
グラフが完全に表現されたら、ようやくそれをコンパイルして実データ上で実行できる。G-APIグラフのコンパイルは、G-APIフレームワークがどのカーネルとネットワークを使用するかを実際に把握する段階である。この設定はG-APIコンパイル引数を介して行われる。
DNNパラメータ
このサンプルでは、DL推論にOpenVINO™ Toolkit Inference Engineバックエンドを使用しており、次のように構成されている:
{
faceXmlPath,
faceBinPath,
faceDevice
};
{
landmXmlPath,
landmBinPath,
landmDevice
};
すべての cv::gapi::ie::Params<> オブジェクトは、そのテンプレート引数で指定されたネットワークに関連付けられる。チュートリアルの冒頭で G_API_NET() によって定義したネットワーク型を、ここに渡す必要がある。
続いて、ネットワーク引数を cv::gapi::NetworkPackage でラップする:
詳細は "Face Analytics Pipeline" の(Configuring the pipeline 節)を参照。
カーネルパッケージ
この例では多数のカスタムカーネルを使用し、加えて、該当する箇所ではFluidバックエンドを使ってG-APIの標準カーネルのメモリを最適化している。結果として得られるカーネルパッケージは次のように構成される:
custom::GCPULaplacian,
custom::GCPUFillPolyGContours,
custom::GCPUPolyLines,
custom::GCPURectangle,
custom::GCPUFacePostProc,
custom::GCPULandmPostProc,
custom::GCPUGetContours>();
customKernels);
ストリーミングパイプラインのコンパイル
G-APIは、"Streaming" モードでコンパイルすると、ビデオストリームの実行を最適化する。
これについての詳細は "Face Analytics Pipeline" の(Configuring the pipeline 節)を参照。
ストリーミングパイプラインの実行
G-APIストリーミングパイプラインを実行するために必要なのは、入力ビデオソースを指定し、cv::GStreamingCompiled::start() を呼び出して、パイプラインの処理結果を取得することだけである:
if (parser.has("input"))
{
}
auto out_vector =
cv::gout(imgBeautif, imgShow, vctFaceConts,
vctElsConts, vctRects);
avg.start();
{
if (!stream.
try_pull(std::move(out_vector)))
{
else continue;
}
frames++;
if (flgLandmarks == true)
{
config::kClrYellow);
config::kClrYellow);
}
if (flgBoxes == true)
for (auto rect : vctRects)
cv::imshow(config::kWinFaceBeautification, imgBeautif);
}
結果が準備でき、パイプラインから取得できるようになったら、それを画面に表示し、GUIイベントを処理する。
詳細は "Face Analytics Pipeline" チュートリアルの Running the pipeline 節を参照。
まとめ
このチュートリアルには2つの目的がある。OpenCV 4.2で導入されたG-APIの新機能の使い方を示すことと、サンプルの顔の美化アルゴリズムの基本的な理解を与えることである。
アルゴリズムを適用した結果:
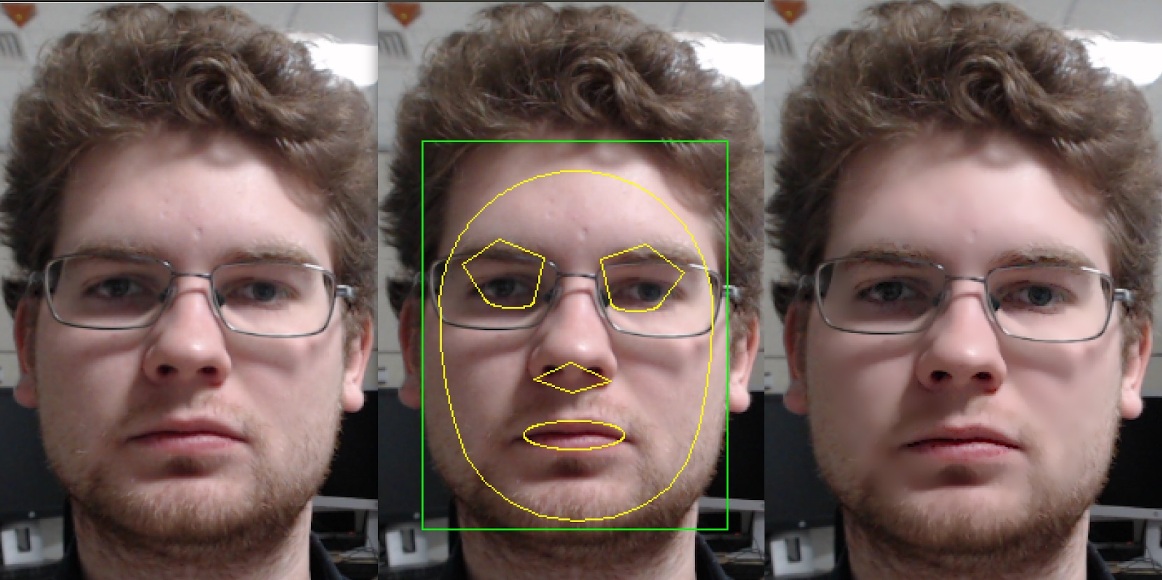
Face Beautification example
テストマシン(Intel® Core™ i7-8700)では、G-APIで最適化されたビデオパイプラインは、シリアル(非パイプライン)版を 2.7 倍上回る性能を示した。つまり、このような自明でないグラフであっても、適切なパイプライン化によって性能を3倍近く向上させられるということである。