前のチュートリアル: 輪郭の特性
次のチュートリアル: 輪郭の階層構造
目的
この章では、次のことを学ぶ
- 凸性欠陥 (convexity defects) と、その求め方。
- 点から多角形までの最短距離を求める
- 異なる形状のマッチング
理論とコード
1. 凸性欠陥 (Convexity Defects)
輪郭に関する2番目の章で凸包 (convex hull) とは何かを見た。この凸包からの物体のずれは、いずれも凸性欠陥とみなすことができる。
OpenCVにはこれを求めるための既製の関数 cv.convexityDefects() がある。基本的な関数呼び出しは以下のようになる:
void convexHull(InputArray points, OutputArray hull, bool clockwise=false, bool returnPoints=true)
Finds the convex hull of a point set.
void convexityDefects(InputArray contour, InputArray convexhull, OutputArray convexityDefects)
Finds the convexity defects of a contour.
- 覚え書き
- 凸性欠陥を求めるには、凸包を求める際に returnPoints = False を渡す必要があることを忘れないように。
各行がこれらの値を含む配列を返す - [ 始点, 終点, 最遠点, 最遠点までの近似距離 ]。これを画像を使って可視化できる。始点と終点を結ぶ線を描き、最遠点に円を描く。返される最初の3つの値は cnt のインデックスであることを忘れないように。したがって、それらの値を cnt から取得する必要がある。
import cv2 as cv
import numpy as np
assert img is not None, "file could not be read, check with os.path.exists()"
cnt = contours[0]
for i in range(defects.shape[0]):
s,e,f,d = defects[i,0]
start = tuple(cnt[s][0])
end = tuple(cnt[e][0])
far = tuple(cnt[f][0])
void imshow(const String &winname, InputArray mat)
Displays an image in the specified window.
int waitKey(int delay=0)
Waits for a pressed key.
void destroyAllWindows()
Destroys all of the HighGUI windows.
Mat imread(const String &filename, int flags=IMREAD_COLOR_BGR)
Loads an image from a file.
void cvtColor(InputArray src, OutputArray dst, int code, int dstCn=0, AlgorithmHint hint=cv::ALGO_HINT_DEFAULT)
Converts an image from one color space to another.
void line(InputOutputArray img, Point pt1, Point pt2, const Scalar &color, int thickness=1, int lineType=LINE_8, int shift=0)
Draws a line segment connecting two points.
void circle(InputOutputArray img, Point center, int radius, const Scalar &color, int thickness=1, int lineType=LINE_8, int shift=0)
Draws a circle.
double threshold(InputArray src, OutputArray dst, double thresh, double maxval, int type)
Applies a fixed-level threshold to each array element.
void findContours(InputArray image, OutputArrayOfArrays contours, OutputArray hierarchy, int mode, int method, Point offset=Point())
Finds contours in a binary image.
そして結果を見てみる:
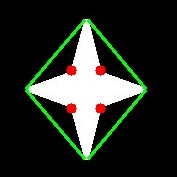
image
2. 点と多角形の判定 (Point Polygon Test)
この関数は、画像内の点と輪郭の間の最短距離を求める。点が輪郭の外側にあるときは負、内側にあるときは正、輪郭上にあるときは0となる距離を返す。
例えば、点 (50,50) を次のように調べることができる:
double pointPolygonTest(InputArray contour, Point2f pt, bool measureDist)
Performs a point-in-contour test.
この関数の3番目の引数は measureDist である。True の場合は符号付き距離を求める。False の場合は、点が輪郭の内側・外側・輪郭上のいずれにあるかを求める(それぞれ +1, -1, 0 を返す)。
- 覚え書き
- 距離を求める必要がない場合は、3番目の引数を必ず False にすること。これは時間のかかる処理であるため、False にすると約2~3倍の高速化が得られる。
3. 形状のマッチング
OpenCVには2つの形状、または2つの輪郭を比較し、類似度を示す指標を返す関数 cv.matchShapes() がある。結果が小さいほどマッチングが良好である。これはhuモーメント値に基づいて計算される。さまざまな測定方法についてはドキュメントで説明されている。
import cv2 as cv
import numpy as np
img1 =
cv.imread(
'star.jpg', cv.IMREAD_GRAYSCALE)
img2 =
cv.imread(
'star2.jpg', cv.IMREAD_GRAYSCALE)
assert img1 is not None, "file could not be read, check with os.path.exists()"
assert img2 is not None, "file could not be read, check with os.path.exists()"
cnt1 = contours[0]
cnt2 = contours[0]
print( ret )
double matchShapes(InputArray contour1, InputArray contour2, int method, double parameter)
Compares two shapes.
以下に示すさまざまな形状で形状マッチングを試してみた:

image
次の結果が得られた:
- 画像 A 同士のマッチング = 0.0
- 画像 A と画像 B のマッチング = 0.001946
- 画像 A と画像 C のマッチング = 0.326911
ご覧のとおり、画像の回転もこの比較にはあまり影響しない。
- 覚え書き
- Hu-Moments は、平行移動・回転・スケールに対して不変な7つのモーメントである。7番目のものはスキューに対しても不変である。これらの値は cv.HuMoments() 関数を使って求められる。
演習
- cv.pointPolygonTest() のドキュメントを確認すると、赤と青で描かれたきれいな画像が見つかる。それは画像上の白い曲線までの全ピクセルからの距離を表している。曲線内部のすべてのピクセルは距離に応じて青になる。同様に外部の点は赤になる。輪郭のエッジは白でマークされている。よって問題は単純である。このような距離の表現を作成するコードを書きなさい。
- cv.matchShapes() を使って数字や文字の画像を比較しなさい。(これはOCRに向けた単純な一歩となるだろう)